
|
||||||||||||||||||||||||||||||||||||||
KEYSTONE RETAINING WALL SYSTEM INSTALLATION
| INSTALLATION STEPS | ||||
|
Installing the Keystone Retaining Wall System is easy. Below are specific installation notes and guidelines |
||||
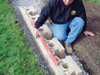
Step 1: Prepare the base leveling pad. After selecting the location and length of the wall, excavate the base trench to the designed width and depth. Compact the base trench soils prior to placing any stone or concrete in the trench. Start the leveling pad at the lowest elevation of the wall. Level the prepared base with a minimum of six inches of well-compacted granular fill or concrete. Keystone recommends additional trench depth for below grade placement of Keystone units on a ratio of one inch below grade for each eight inches of wall height above grade (to a maximum of three units buried.) This lowers the base course below grade locking the wall in place and also helps prevent erosion and scouring at the base of the wall. The base trench should be wide enough to allow for the unit and drainage zone. Walls built to a level condition on a sloping grade require a stepped base. It is best to work out the stepped base as the wall steps up in elevation. |
||||
 |
 |
 |
 |
 |
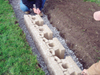
Step 2: Install the base course. When installing the first course, be sure the paired pinholes face up. Place units end-to-end with corners/edges touching and be sure each unit is levelside to side and front to back. Use a string line across the back edge of the units to ensure that the wall is straight. This base course is critical for accurate and acceptable results. |
||||
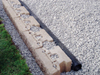
Step 3: Insert the interlocking fiberglass pins. Place two pins in each unit. With the Pinned System, it is easy to build a near vertical wall or a set-back wall. For a near-vertical design, place pins in front holes. Use the rear holes for 1 - 1 1/4-inch set-back. When constructing curved walls, use the front pin position for best results. This will minimize any gapping or binding on curves. |
||||
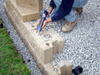
Step 4: Install and compact backfill. Fill in all voidsin and between Keystone unitsusing 3/4 inch (20mm) aggregate. Place drain zones and 4 perforated pipe behind the units if required to achieve a minimum two foot depth of drainage zone from unit face. Compact material in unit cavities appropriately to eliminate settling. When clay or poor soils are present we recommend that the entire geo-grid zone be backfilled with sand, clean angular crushed stone, quarry dust or other suitable granular material. |
||||
Step 5: Install additional courses. IInstall additional courses starting at the straight wall areas. Place units so that they are centered over the two pins below and centered over joint. When stacking the units, pull them toward the face of the wall until it makes full contact with both pins. |
||||
Step 6: Install Keystone caps. Complete the wall with caps by applying or all weather efflorescence-free non shrink premixed mortar adhesive for concrete (such as Nutech Maxipoint) on the top surface of the last course before applying cap units. |
||||